ESLint Setup in Node.js: A Detailed Guide
A code linter can simplify your developer life by a lot. I couldn't imagine coding without one.
It immediately catches many syntax errors and potential bugs as I type. There's no need to wait until deploying to production to find out my code isn't working properly.
This rapid feedback loop empowers me to develop faster and with more confidence, knowing that I have a trustworthy tool watching my back.
Wondering how to start using a code linter with Node.js?
In this tutorial, I'll walk you through the step-by-step process of adding ESLint, the most popular JavaScript linter, into your project so you can start benefiting from it right away.
Requirements
This tutorial assumes no prior knowledge of ESLint and starts from the basics.
I assume you already have a Node.js project and consequently, an existing package.json file (set up with npm init).
Goals
By the end of this tutorial, you'll have a basic ESLint setup up and running. I'll also give you additional resources so you can delve deeper and further customize the linter if you want to.
Overview
Here's what we're going to do:
- Install & configure ESLint in your Node.js project
- Integrate ESLint with VSCode for real-time feedback within your editor
Without further ado, let's dive in.
Step 1 – Install & configure ESLint in a Node.js project
ESLint offers an interactive CLI package that simplifies installation and configuration. It prompts a series of questions about your project and preferences.
At the root of your project folder, open the terminal and type:
npm init @eslint/config
Here are the questions you'll face:
- How would you like to use ESLint? - Select the second option: "To check syntax and find problems". ESLint can also enforce a coding style but for that, I recommend using Prettier instead.
- What type of modules does your project use? - Choose the option that matches your project: ES Modules (option 1) with
importor CommonJS (option 2) withrequire. - Which framework does your project use? - Since we're working with a Node.js project, select "None of these".
- Does your project use TypeScript? - Pick "Yes" if applicable. Otherwise, opt for "No". If you're unsure, it's likely "No".
- Where does your code run? - This is a multiple-choice question and "Browser" will be pre-selected. Deselect "Browser" and select "Node".
- What format do you want your config file to be in? - Pick "JavaScript". JSON configurations lack comment functionality, and YAML demands familiarity with its syntax.
- Would you like to install them now? - Depending on your earlier choices the dependencies will vary. At a minimum, the setup wizard will introduce
eslint@latestto your project. Click "Yes". - Which package manager do you want to use? - Choose "npm".
Upon completion, the wizard will install dependencies and generate a .eslintrc.js file.
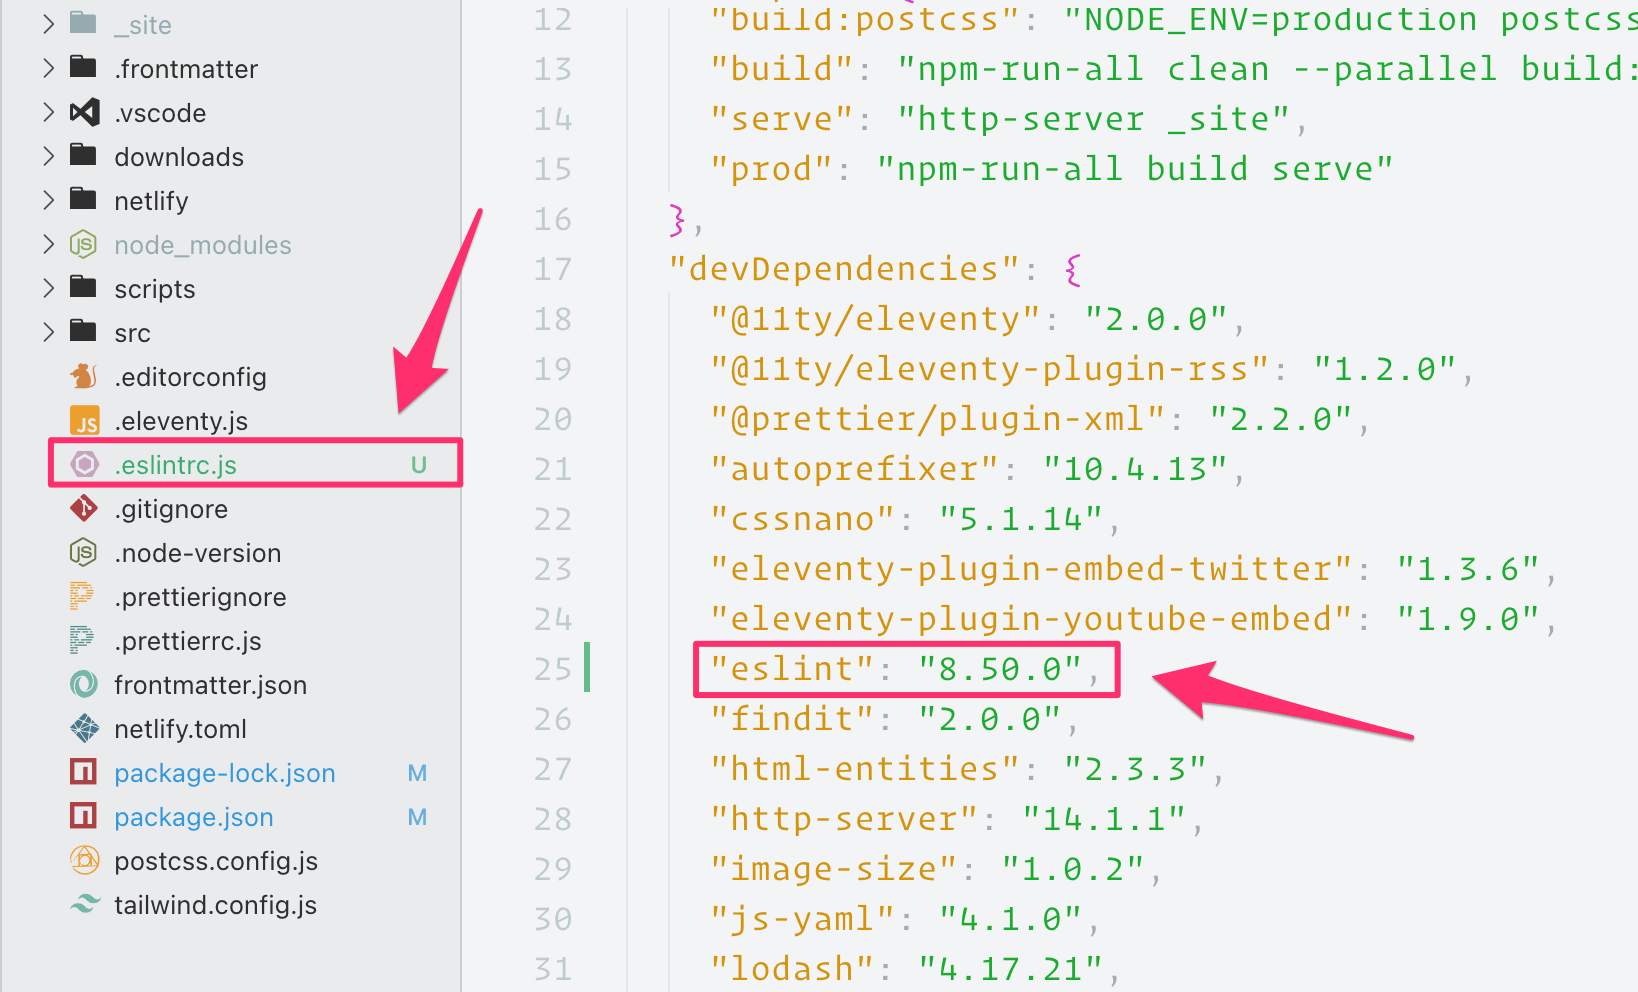
Inspect your package.json file. You'll find the latest version of eslint listed under devDependencies. ESLint is a development dependency since you only need it during development to enhance your workflow. Production environments often omit development dependencies to speed up deployments.
If you opted for TypeScript, the wizard would also have added the @typescript-eslint/eslint-plugin and @typescript-eslint/parser packages. The former is an ESLint plugin with additional linting rules made possible by strict typing. The latter enables ESLint to comprehend TypeScript syntax.
Another addition to your project is the .eslintrc.js file. Inside, you'll find configurations that may differ based on your responses.
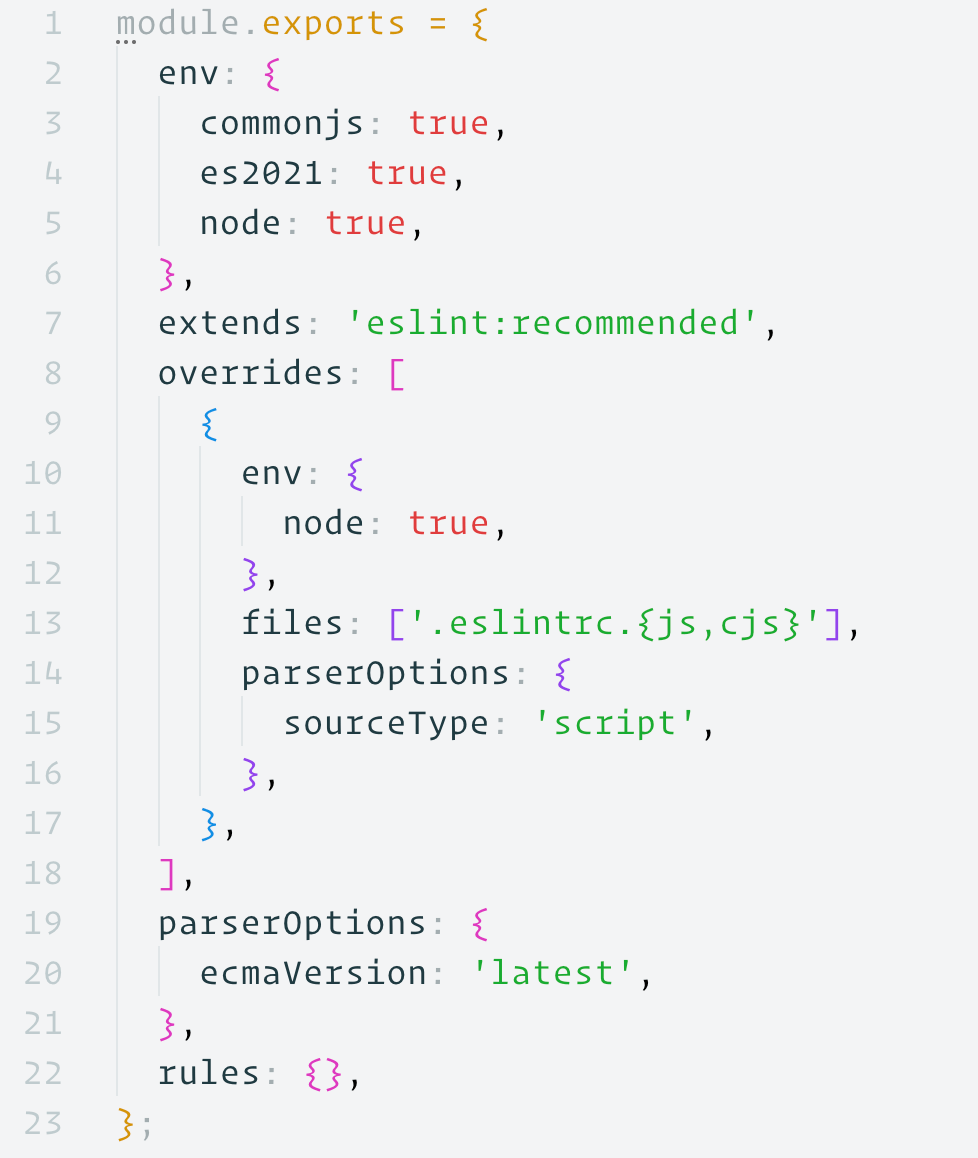
Let's delve deeper into each configuration so you understand what's going on. Regardless of your responses to the setup questions, these are the configurations you'll encounter:
env.es2021- Introduces language-specific global variables from ECMAScript 2021. Recent additions to the language includeBigInt,Atomics, andAggregateError. Why not 2022 or 2023? Because those ECMAScript versions haven't introduced new global variables. You could addes2023to your config, but it wouldn't make any difference. Sourceenv.node- Includes global variables specific to Node.js, such asprocessandAbortController. Sourceextends- Enables additional rules recommended by ESLint undereslint:recommended. ESLint Rules documentation & Sourceoverrides- Allows configurations from this file to be overridden for specific files. Essentially, this is to ensure the configuration file itself (.eslintrc.js) is linted properly. ESLint Overrides documentationoverrides[0].env.node- Similar to the mainenv.nodeconfiguration, it adds Node.js-specific global variables.overrides[0].files- Specifies the files for which the configuration should be overridden.overrides[0].parserOptions.sourceType- Directs the parser to interpret the file as ascript(CommonJS).parserOptions.ecmaVersion- Instructs ESLint to parse the codebase using the latest ECMAScript version.rules- Initially, this is an empty object. Later on, as you expand your linting preferences, this is where you'll define custom rules. ESLint Rules Documentation
If you opted for ES Modules, you'll see this additional configuration:
parserOptions.sourceType- Informs the parser to interpret all files asmodule(ES Modules).
If you chose CommonJS:
env.commonjs- Includes CommonJS global variables, such asrequireandmodule. Source
If your project uses TypeScript, you'll see these configurations:
extends- In addition to the recommended rules from ESLint, rules tailored for TypeScript are enabled withplugin:@typescript-eslint/recommended. TypeScript ESLint Rules documentationparser- Uses the TypeScript parser to convert TypeScript code so ESLint can understand it. ESLint Parser documentationplugins- Imports the@typescript-eslintplugin which gives you access to TypeScript-specific rules and its custom parser. TypeScript ESLint documentation
Now, you're all set!
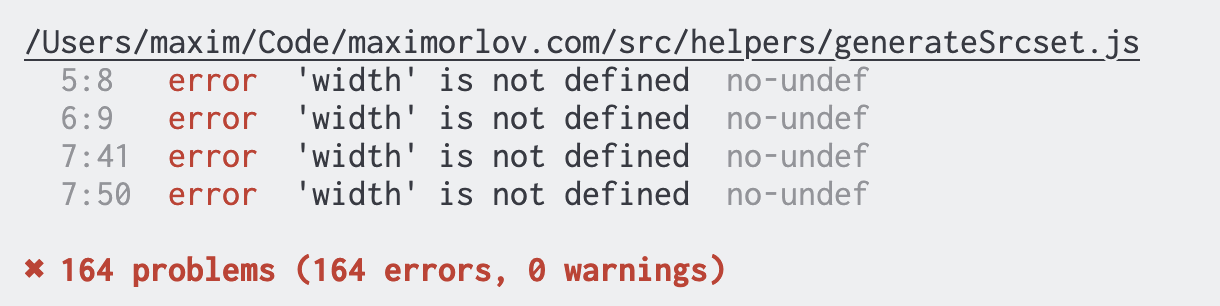
In your terminal, you can run npx eslint . to lint your project. If there are issues, they'll be displayed in your console.
ESLint can even automatically fix certain types of errors. Add the --fix flag to the command: npx eslint --fix ..
To learn more about ESLint, the ESLint documentation is an excellent resource.
Step 2 – Integrate ESLint with VSCode
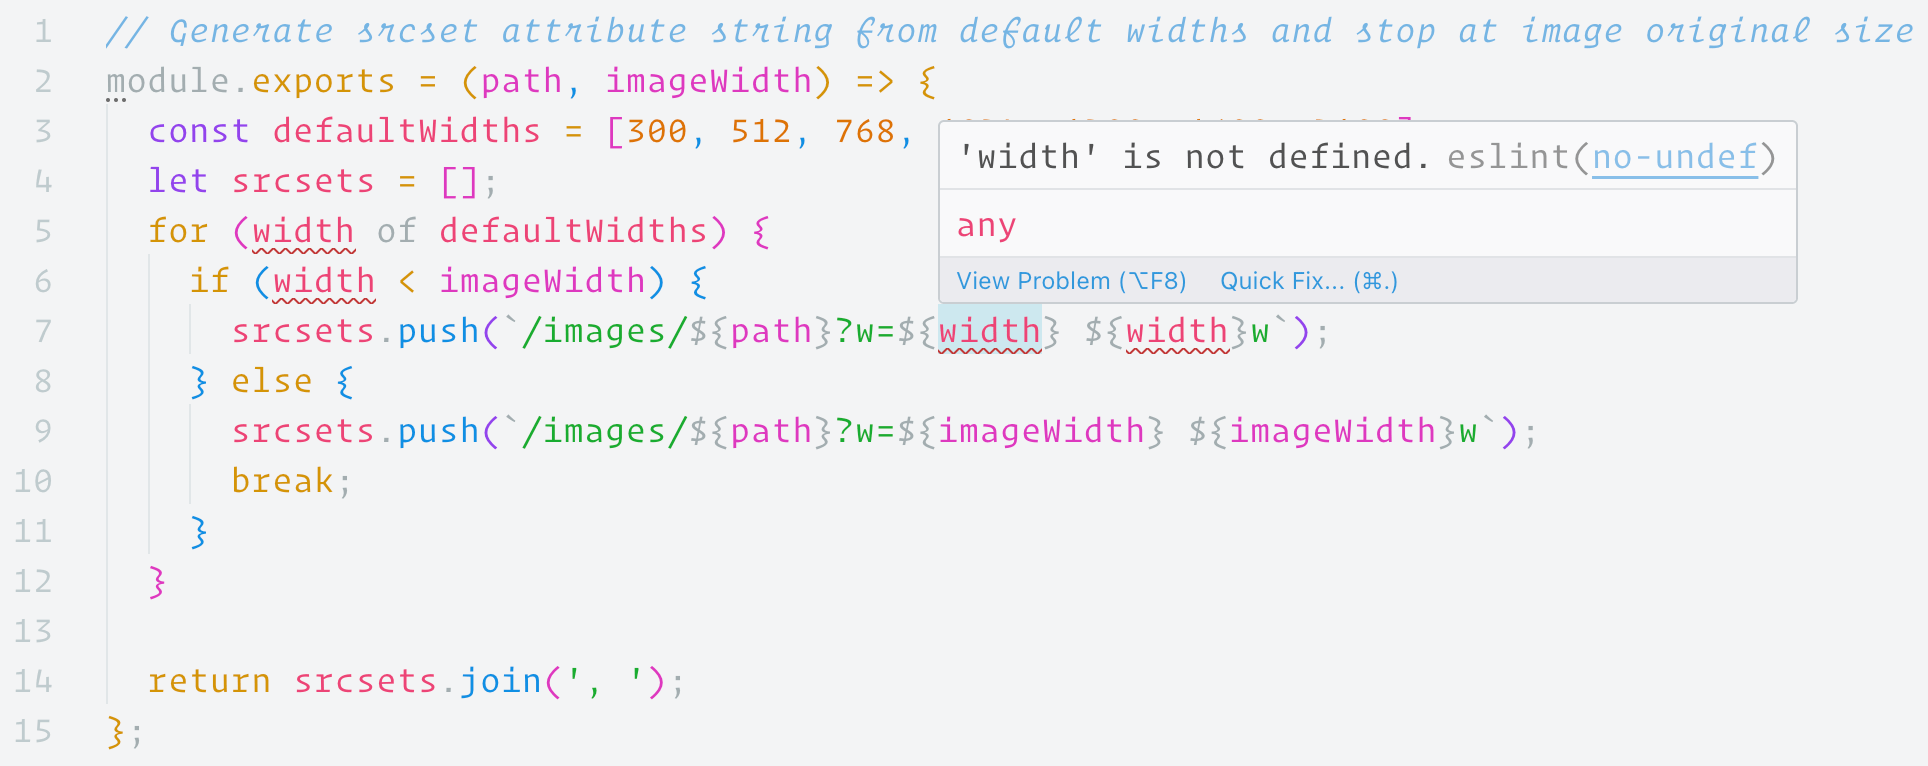
To get continuous feedback from ESLint as you code, rather than running the command repeatedly, you can integrate ESLint into your editor. I'll cover integration with VSCode, given its popularity.
Simply download the ESLint extension for VSCode.
Once the extension is installed, ESLint errors will be directly highlighted in your editor.
And that's a wrap!
From now on you'll always have ESLint watching your back and preventing you from making silly mistakes. After all, we're all human and make mistakes :).
Continue reading to discover 14 ESLint rules for improving your asynchronous JavaScript code.
Happy coding! 🎭