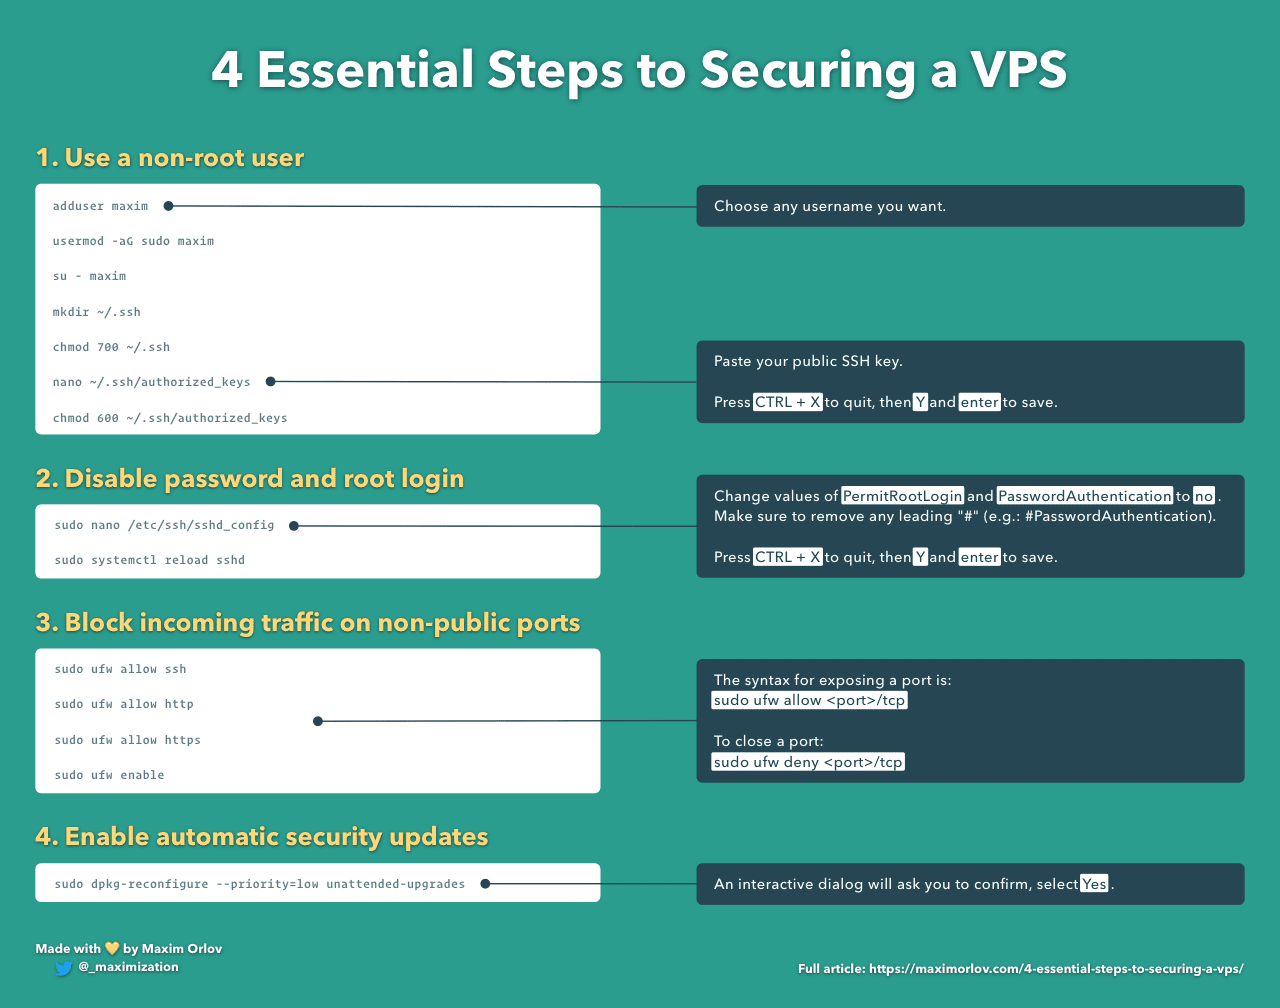
4 Essential Steps to Securing a VPS
Do you feel like you're always missing something security-related when deploying your application?
Creating a public server is an anxious feeling. How do you protect your data and keep the bad guys out?
A Platform-as-a-Service like Heroku charges a premium to handle server security. Wouldn't it be nice if you had the affordable price of a VPS and the peace of mind of a PaaS?
Learn the 80/20 rule to securing a server and apply these four security measures to stay ahead of your peers.
Read on to find out what the four security steps are, and watch the video to see them applied in practice. Use the accompanying security cheatsheet as a checklist next time you create a server.
1. Use a non-root user
First thing I usually do to secure a new VPS instance is to create a new user. I use this user instead of root to log into the VPS and run commands. It's good to avoid using the root user because it has unrestricted access to the machine and can potentially cause serious damage.
Using a non-root user follows the principle of least privilege and adds a layer of protection against intruders looking to gain root access.
Creating a new user
While logged into the VPS as root, create a new user with the following command:
# Choose any username you want
adduser maxim
You'll be asked to create a password and fill in a few additional questions. Only the password is required and you can hit enter to leave everything else blank. Remember the password because you will need it every time you use sudo to get privileged access.
To verify the user has been created successfully, you can run id <user.
$ id maxim
uid=1000(maxim) gid=1000(maxim) groups=1000(maxim)
Subsequently, we'll give this user the ability to run commands as root with sudo since we will need that later in this article. You can accomplish that by adding the user to the sudo group:
# Use your username here
usermod -aG sudo maxim
-aG stands for append to group. If you run id <user> again you can see sudo has been added to this user's group list.
$ id maxim
uid=1000(maxim) gid=1000(maxim) groups=1000(maxim),27(sudo)
Setup SSH for the new user
Next step is to add your public key to the user's .ssh folder so you can log in as the user with SSH.
Let's switch to the new user and create a .ssh folder in the user's home directory:
# Switch to the new user
su - maxim

# Create the SSH folder
mkdir ~/.ssh
SSH is nit-picky about files and folders permissions and it will fail with an error if they are too permissive. Let's change the folder's permission so only this user is allowed to read and write to it:
# Restrict access to this user only
chmod 700 ~/.ssh
In this folder, we'll create a file named authorized_keys which will contain your public key. SSH will look for the key in this file when you connect to the server.
# Create and open the file where SSH will look for your public key
nano ~/.ssh/authorized_keys
The above command will open the file in the nano editor allowing you to paste your public key. Hit CTRL + X to quit, then Y and enter to save.
Confirm the key is saved by running cat ~/.ssh/authorized_keys. This will print the contents of the file to the terminal and you should see your public key.
Let's change the permissions of this file as well:
# Restrict access to this user only
chmod 600 ~/.ssh/authorized_keys
Open a second terminal session and confirm you can SSH into the server with ssh <user>@<server_ip>. If you've followed the above steps correctly, you should see the Ubuntu welcome message.
Close the first terminal session by running exit twice and proceed to the next section.
2. Disable password and root login
Cloud servers are often a target for brute force attacks. Using SSH with a password poses a security threat as passwords tend to be weak and eventually guessable given enough time.
A private/public key pair has many more bits of data making them impossible to guess in within the human lifespan.
It's good practice to disable password login and protect your VPS from these type of attacks. It also gives you peace of mind that, unless an attacker gets a hold of your private key, the only person who will have access to the server is you.
While we're at it, we will also disable logging in as root since we will not be using it anymore.
Both settings are in a global SSH configuration file. Changing this file requires you to use sudo which will ask you for a password. This is the same password you chose when you created the user.
# Open the SSH config file in the `nano` editor
sudo nano /etc/ssh/sshd_config
Scroll down until you find PermitRootLogin and change its value to no. Do the same for PasswordAuthentication. Make sure they're not commented out by removing any leading # (e.g.: #PasswordAuthentication). Press CTRL + X to quit, then Y and enter to save.
Finally, you need to restart the SSH service for the changes to take effect:
# Restart the SSH service
sudo systemctl reload sshd
Verify that root and password login are disabled by trying to log in as the root user ssh root@<server_ip>. You should see Permission denied (publickey). printed in the terminal.
3. Block incoming traffic on non-public ports
Using a firewall to close all ports, except those that need to be public, is an essential part of server security. Every application running on a machine is a potential vulnerability that can be exploited by an intruder.
Fewer exposed applications means a smaller attack surface resulting in a more secure server.
A firewall consists of a set of rules. Each rule serves as a filter for incoming/outgoing traffic deciding whether a package is allowed to continue to its destination or not.
We'll use UFW (Uncomplicated FireWall) to create firewall rules. UFW is an easy-to-use program built on top of iptables — the traditional and more difficult interface for configuring firewall rules. UFW comes pre-installed on Ubuntu.
For most newly-created VPS instances, we want to begin by opening up three ports: 22 for SSH, 80 for HTTP traffic and 443 for HTTPS traffic. You can open a specific port or you can specify a service name that is mapped to a port. In the examples below we use service names. sudo ufw allow http is the same as sudo ufw allow 80/tcp.
# Allow SSH connections
sudo ufw allow ssh

# Allow HTTP traffic
sudo ufw allow http

# Allow HTTPS traffic
sudo ufw allow https
You will see two rules added after each command, one for IPv4 and another for IPv6. The rules don't go into effect until we enable the firewall:
# Enable firewall
sudo ufw enable
You will get a warning that enabling the firewall might close the active SSH connection. We've added a rule for SSH so we don't have to worry about that. Type y followed by enter to proceed.
Let's verify the firewall is up and running:
$ sudo ufw status
Status: active

To                         Action      From
--                         ------      ----
22/tcp                     ALLOW       Anywhere
80/tcp                     ALLOW       Anywhere
443/tcp                    ALLOW       Anywhere
22/tcp (v6)                ALLOW       Anywhere (v6)
80/tcp (v6)                ALLOW       Anywhere (v6)
443/tcp (v6)               ALLOW       Anywhere (v6)
You might add additional services in the future that need to be open to the public. The syntax for exposing a port is: sudo ufw allow <port>/tcp. To close a port, you run: sudo ufw deny <port>/tcp. Changes will take effect immediately without needing to restart the firewall.
4. Enable automatic security updates
The final step to making the server more secure is to enable automatic security updates. The open-source community frequently releases security updates making sure vulnerabilities are patched soon after they are found. Conducting manual updates regularly is time-consuming and often forgotten.
By automating this process you're making sure the system is up-to-date with the latest security fixes.
Ubuntu comes pre-installed with a package named unattended-upgrades that lets us configure automatic updates. This tool will regularly check if the packages installed on your machine have new releases and install them if needed. You can granularly specify which updates you want to be installed and which ones to skip. We'll turn automatic updates only for security releases to minimise the chance of introducing breaking changes.
The following command enables automatic security updates:
# Enable automatic security updates
sudo dpkg-reconfigure --priority=low unattended-upgrades
You will see an interactive dialog asking if you want to enable automatic updates, select Yes.
This command edits two files:
/etc/apt/apt.conf.d/20auto-upgrades(configures when and how the script should run)/etc/apt/apt.conf.d/50unattended-upgrades(configures whether an update should be installed or skipped)
If you want to learn more, visit the automatic security updates documentation on the Ubuntu website.
To verify that automatic updates are enabled:
$ apt-config dump APT::Periodic::Unattended-Upgrade
APT::Periodic::Unattended-Upgrade "1";
The "1" stands for every 1 day. You've now enabled daily automatic security updates for your server and won't have to worry about that anymore. 🎉
Summary
We've implemented 4 quick steps that go a long way in securing a VPS. We:
- Created a non-root user instead of using root to mitigate the security threat
- Prevented brute force attacks by disabling password login
- Blocked incoming traffic on non-public ports thereby reducing the attack surface
- Ensured the system is up-to-date with the latest vulnerability patches by enabling automatic security updates
By applying these measures you're far ahead of the majority of the cloud servers that are out there in the wild. It's a low amount of effort in return for peace of mind. Pat yourself for being a good citizen of the cloud. 🌟☁️