Set up Automated Deployments From Github With Webhook
Hosting your app on a VPS instead of a Platform-as-a-Service has you missing out on cool features such as automated deployments.
Wouldn't it be awesome if you had Heroku-like auto-deployments on your server? 💫
But how do they even work? How does one go about setting up automated deployments for an application?
Being able to push your changes and see them live a few seconds later would be a major productivity boost for a busy developer like yourself.
In this tutorial, you'll speed up your workflow by setting up automated deployments for your app. 💨
Goals
We will end up with a workflow where the production application is in sync with the repository's main branch. In other words, the latest commit on the main branch is always the same code that runs the live application.
This is a time saver because you don't have to look up which version of your code is currently deployed. You'll always be able to refer to the main branch as the production branch.
Overview
To accomplish our goal, we need to:
- Add a webhook on Github which will call our endpoint each time we push to the repository
- Create an endpoint with Webhook that runs the redeploy script when it receives a request from Github
- Write a redeploy script that fetches the latest commit from Github and restarts the application
Requirements
To follow along, you'll need a:
- Secure VPS instance with SSH access and the ability to run commands as sudo
- Node.js application running in production and version-controlled on Github
- Reverse proxy (Nginx/Apache) and basic knowledge of configuring it
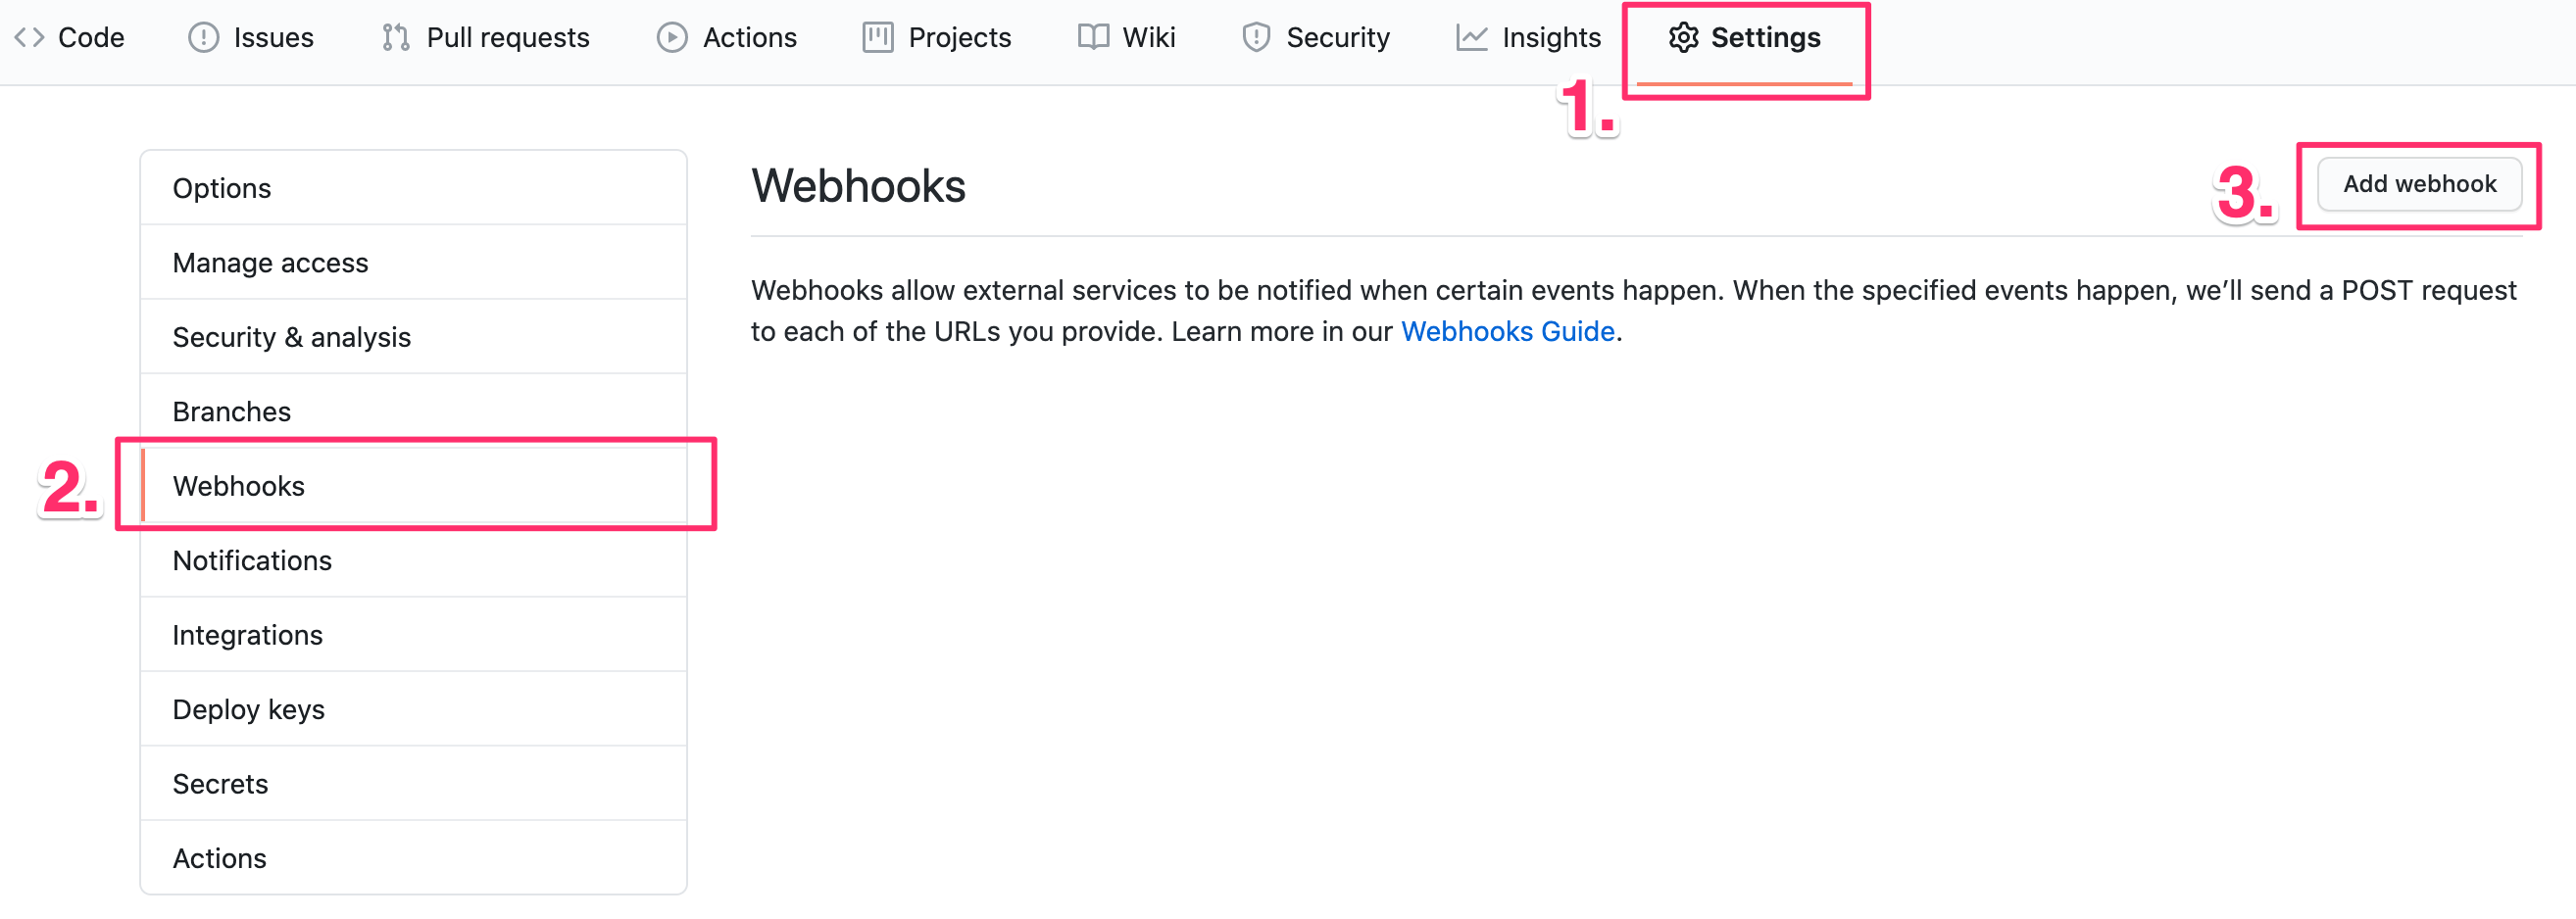
Step 1 — Add a repository webhook on Github
To add a webhook to an existing repository, navigate to the Github repository page and go to "Settings" > "Webhooks". Click on "Add webhook".
Add a webhook with the following settings:
- Payload URL — A custom domain that points to your server or your server's public IP, followed by
/hooks/and the name of your application (e.g.:https://yourdomain.com/hooks/nodejs-app) - Content type — Choose
application/json - Secret — A shared secret between Github and your server. Without it, anyone could redeploy your application by calling your endpoint. I like to use RandomKeygen to generate secure strings for this kind of stuff
- SSL verification — Will appear only if you've filled in a payload URL that starts with HTTPS. Assuming you have a working SSL certificate for your domain, leave this option enabled
- Which events would you like to trigger this webhook? — Default option: "Just the
pushevent." - Active — Uncheck this option. We will activate the hook later on after we create the endpoint on the server
Step 2 — Create an endpoint using Webhook
Webhook is a lightweight server that allows you to easily create and configure HTTP endpoints, which you can then use to execute a script or a set of commands. We will use Webhook to listen for incoming requests from Github, and when a request is made, run our redeploy script.
Install Webhook
To install Webhook on Ubuntu, run:
sudo apt install webhook
Configure Webhook endpoint
Configuring Webhook is done through a single JSON file. The file holds an array of items with each item representing an endpoint.
Create a hooks.json file in your home (~) folder:
nano ~/hooks.json
And add the following contents:
[
  {
    "id": "nodejs-app",
    "execute-command": "/home/maxim/redeploy-nodejs-app.sh",
    "command-working-directory": "/home/maxim/nodejs-app",
    "trigger-rule": {
      "and": [
        {
          "match": {
            "type": "payload-hash-sha1",
            "secret": "yourgithubsecret",
            "parameter": {
              "source": "header",
              "name": "X-Hub-Signature"
            }
          }
        },
        {
          "match": {
            "type": "value",
            "value": "refs/heads/main",
            "parameter": {
              "source": "payload",
              "name": "ref"
            }
          }
        }
      ]
    }
  }
]
Let's break it down and learn what each setting does:
- id - Name of your application. Will be used to create the endpoint. For example,
nodejs-appwill result in the following endpoint/hooks/nodejs-app. It should match "Payload URL" from the previous step so Github calls the correct endpoint - execute-command - Command or script to execute when the endpoint is called. Should point to the redeploy script that we'll write in the next step
- command-working-directory - Working directory that will be used by the script when called. Set this to the folder where your application lives
- trigger-rule - Rule that will be evaluated before executing the script. We use the
andproperty to specify the request should meet two criteria:- It should have an
X-Hub-Signatureheader present with the SHA1 hash ofsecret. This is how Github passes the secret to us so we can verify the request is legitimate. Value ofsecretshould match "Secret" from the previous step - It should have a
refproperty in the body that equalsrefs/heads/main, so we only redeploy on a push to themainbranch. Change this value if your branch has a different name
- It should have an
Check the hook definition page for a complete list of all configuration options if you're curious.
Save the file with CTRL + O and enter. Then exit nano editor with CTRL + X.
Start Webhook and forward incoming requests
To start Webhook, run this command:
webhook -hooks ~/hooks.json &
By default, Webhook starts a web server that listens for incoming requests on port 9000. You will need to configure a reverse proxy, like Nginx, to forward HTTP requests to Webhook.
Alternatively, you can change the "Payload URL" of the Github webhook to include the port after the domain, like so https://yourdomain.com:9000/hooks/nodejs-app. Make sure port 9000 is not blocked by the firewall.
I recommend, however, to go with the reverse proxy approach as it's generally more secure to have everything come through the HTTP (80)/HTTPS (443) ports and have all other ports closed for the public.
Below is a configuration example for Nginx that redirects all requests with destination https://yourdomain.com/hooks/... to Webhook.
server {
  listen      443 ssl http2;
  listen      [::]:443 ssl http2;
  server_name yourdomain.com;

  # SSL config
  # ...

  # Webhook reverse proxy
  location /hooks/ {
    proxy_pass http://127.0.0.1:9000/hooks/;
  }
}
Don't forget to reload Nginx so it picks up the configuration changes:
sudo nginx -s reload
Step 3 — Write redeploy script
Lastly, we'll write a script to redeploy the application. It will do the following steps in sequence:
- Fetch the latest code from Github
- Install NPM dependencies
- (Optional) Build step
- Restart the application
Create a file named redeploy-nodejs-app.sh, or give it a different name that's consistent with execute-command in hooks.json. Add the following to it:
#!/bin/sh

# 1. Fetch the latest code from remote
git pull -f origin main

# 2. Install dependencies
npm install

# 3. (Optional) Build step that compiles code, bundles assets, etc.
# npm run build

# 4. Restart application
pm2 restart nodejs-app
You can make adjustments to the redeploy script to suit your setup however needed.
After you save the file, let's make it executable with:
chmod +x redeploy-nodejs-app.sh
This last step is important otherwise Webhook will fail to execute the script with a permission error.
Now go back to Github, activate the webhook, make a change in your code and push to remote. If all went well, you should see the change live after a few seconds! 🥳